Yesterday I took delivery of my Ondu Kickstarter Pinhole camera.
I was #47 on the list, so I was one of the lucky ones to get their camera early.
There were several models offered, but I selected the 35mm size since it was advertised as a pocket size camera and I don't really have a pinhole camera that small. This one is 4 1/2 x 3 1/4 x 1 5/8 inches. A nice compact size and easy to take along anywhere!
So let's get to the review.
The box arrived and at first look I was a bit concerned. Look at the photo below and you'll understand why...
But I really wasn't too worried because how much damage could happen to the wooden pinhole box inside?
The next photo shows the packaging (which could have been a bit better in my opinion) and the camera looks like it is undamaged.
The camera itself is quite nice and well built. The Walnut and Maple go well together and I selected a light face with dark trim. Some cameras have dark faces and light trim, but I like mine better. A hand made camera is a thing of beauty and this one does not disappoint.
Front view.
Front view with the shutter open.
The shutter mechanism is probably my favorite part of the camera because it's one of those simply elegant things you come across every so often. The shutter pivots on a screw and then snaps in place with the magnet. There's no jerking or tugging it open or closed- just butter smooth action! This is a real nice feature.
Top view.
The winding knobs are nice and work well. I will probably file some grooves in mine to give them some extra traction, but more about that later.
Back view.
Nice maple back. No complaints about that!
Bottom view with the tripod socket.
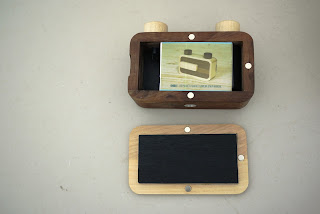
Let's take a look inside.
The back is held on by 3 very strong magnets that are indexed so the back will only go on one way. Inside is a folded instruction page that describes details on operating the camera. The instructions are easy to understand and have small photos for clarification.
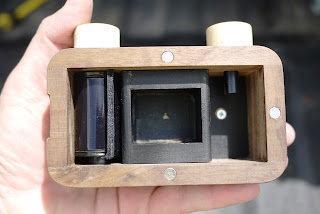
A deeper look inside.
It looks good initially...but how about that shiny brass piece that the pinhole is drilled into??
It's okay, but I went ahead and put black tape over that to cut down on internal reflections that might bounce around inside. This is a small extra step that could have easily been done, but hey, for the price of this camera I'm not really going to complain, plus I like to dink and tinker...so all is good.
Oh, and before I forget, since I build cameras I'm pretty picky about the pinholes being clean! I'm not uptight about the size, but I'm a stickler for the hole being clean and round.
I used a 10x loupe to inspect the pinhole and it looked pretty good. It had a few minute bits of debris, maybe dust from packing and shipping, so I used some canned air to blow it out. I also took a needle point and delicately twisted it around in the hole to clean it a bit more.
Other than that, the pinhole looks nice. I can't see any tooling marks, so I'm guessing it was made with a laser..but don't quote me on that because I really don't know.
Okay, here's the blacked out insides.
I used a fine point Sharpie and drew a small circle around the teeny pinhole so I would NOT tape over it.
You can also see the film take up canister that comes with the camera. I wondered about this, and wondered why the camera would work like this and not with just a spool. I figure it's because if the back does happen to come off the camera while in use, you have only ruined a couple of frames and not the entire roll of film.
The screw inside the right chamber serves as the pivot for the shutter on the other side. I was going to paint it black, but since it's under the film cannister when the camera is loaded, there's no need.
The included instructions tell how to load the film and also state to wind the film 1.5 turns to space the frames apart to not have overlap.
I think this is a bit too much, and as you can see from my test strip below 1.5 turns is more than enough. Next time I'm going to only turn one rotation between frames and see how that works out. This will be a trial and error type thing, and I plan on making little index marks on the winding knobs so I can see when a full rotation has been made.
And now for a couple of test shots.
I used Fuji 200 color print film. The instructions have tables for different film speeds and times but since I am a "I am the emulsion" type shooter, I just loaded the camera and took it outside for some fun.
It was late afternoon and the Sun was pretty low so I made my exposures about 5 seconds long.
This first one was directly aimed toward the Sun and I must admit the fringing is pretty good! I like the rainbow effect and can see it being used artistically in the future.
This next one was also 5 seconds long. There was a light breeze blowing so the out of focus fuzziness is due to that.
Another shot aimed toward the Sun.
Once again it was breezy, so the Sunflowers were moving a bit. The Sun flare is nice too!
A few thoughts on the camera follow:
It's nice and worth the cost for a handmade Walnut and Maple pinhole camera.
The magnets are really strong and will keep the back on no problem. I don't know if they are strong enough to keep the back on if the camera suffers a sudden impact, like dropping it, but I'm not too worried about them failing.
The winding knobs are kind of tought to wind once the film is about midway through the roll. I think this will ease up over time. If it doesn't than pliers or some grooves cut into the knobs for better traction might help. Only time will tell on that one.
The instructions are adequate. Actually they are nice, and more than what I anticipated.
I think the internal packaging could have been better. Maybe some bubble wrap and not just wadded up paper. The paper was fine, but there should have been more of it.
Having the magnets indexed on the back and back cover is nice. You can't put the back on the wrong way.
The final sanding could have been a touch better too. But, I work with wood and this is just a picky point on my part. I think the camera will develop a very nice natural patina from the oils in my hands after use. This will just make it that much more personal.
It's a fun camera!
Here's the link to the Ondu Kickstarter page if you want one of your own!
http://www.kickstarter.com/projects/ondu-/ondu-pinhole-cameras


thanks for this insightful review...I tend to look too closely at ready~made pinhole cameras after building so many. The devil is in the details! I'm now looking at the 135 pano!!
ReplyDeleteDon't cut the knobs!
ReplyDeleteWrap a rubber band around it instead!
Have you come up with a template for frame marks yet? I'm hoping mine arrives soon, and I'd love to know how you've dealt with frame spacing.
ReplyDelete